A post by Rahul Mistry@http://sixrevisions.com/web-development/advanced-image-optimization/


 Source: dcurt.is


Advanced Image Optimization Tricks
You can use automated image optimization tools to compress your images. However, if you also take the time to manually optimize them, you can further improve your results. Here are five techniques for manually optimizing images.
Gaussian Blur JPEG Optimization
Gaussian blur softens the details of an image. In photo-editing, it’s typically used to enhance a photo’s quality or to give it an interesting visual effect.
However, if you only introduce a small amount of Gaussian blur to a photo — an amount that doesn’t alter its visual fidelity too much — you can lower its file size.
Demonstration
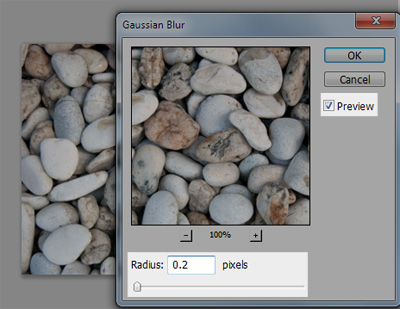
The following image is 60.9 KB:
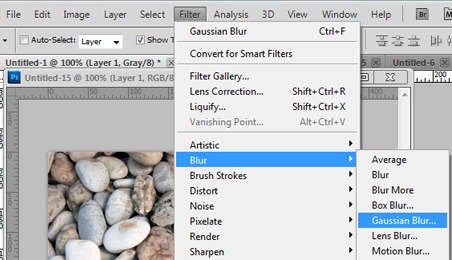
We’ll open the image in Photoshop and then we will apply Filter > Blur > Gaussian Blur.
We then increase the Radius option until it starts to noticeably reduce the sharpness of the image. When then choose a value that’s visually acceptable to us.
After applying the Gaussian Blur filter, we then save our image in the normal manner.
Here is the optimized image:
The optimized image is 58.7 KB — a 3.6% decrease in file size.
Image Posterization
Posterization allows us to lower the file size of an image without harming the perceived image quality too much. Posterization works by converting continuous color gradients into non-continuous segments that require fewer colors to render.
Demonstration
In this demo, I will use a PNG image from a freebie:
The PNG image above is 51.0 KB.
I opened the PNG image in Photoshop to posterize it.
To posterize the image, go to Image > Adjustments > Posterize. In the Posterizedialog window, check the Preview option to see your edits in real-time. Set the Levelsoption to the lowest possible value you can get away with.
For my example, at a Levels value less than 76, the perceived image quality degradation is no longer acceptable to me.
After applying the image adjustment, we then just save the PNG as we normally would.
Below is the optimized image:
Because I was very aggressive with the posterization, the optimized image is only37.6 KB — a 26.3% decrease in file size.
Further Reading
- Clever PNG Optimization Techniques — this article on Smashing Magazine goes into greater detail on how posterization works and covers other advanced image optimization tricks such as scanline filtering and dirty transparency
- Most Effective Method to Reduce and Optimize PNG Images — this step-by-step tutorial shows you how to posterize images in Photoshop
- Image Posterization — This article discusses the technical aspects of posterization
Pixel-fitting
Pixel-fitting is a useful technique for ensuring high-quality results for vector graphics that are converted to raster graphics.
Simple, non-photographic images such as icons and logos are best created as vector graphics because doing so allows us to scale them to different sizes without fidelity loss.
However, a problem often occurs when vector graphics are converted into static image formats (raster graphics) such as JPEG or PNG. When we use an image-editing software like Photoshop to automatically convert a vector graphic to a raster graphic, it tries to do its best to smooth out the edges — an automated process referred to as anti-aliasing.
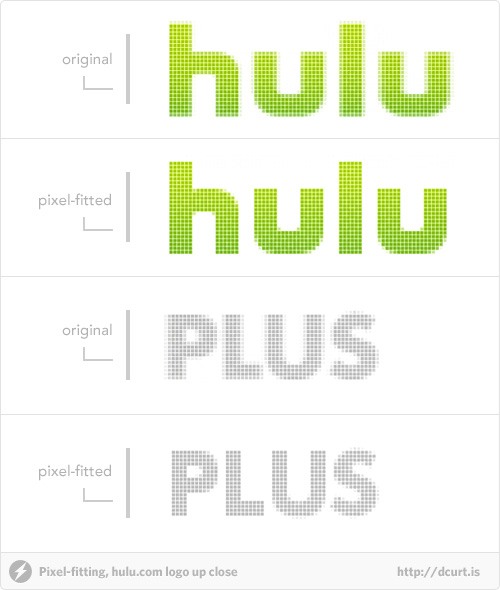
The results of anti-aliasing varies. Often it leads to poor-quality results. In order to enhance the quality of the graphic, we can manually edit the pixels to make sure they fit inside the pixel grid. This is called pixel-fitting (or pixel hinting).
Using an image editor such as Photoshop, you can zoom into the vector graphic and then manually move its vector paths a bit until they fit perfectly inside the pixel grid before you save the vector as a raster:
Pixel-fitting only works for straight lines so you will have to rely on anti-aliasing to display curves.
Further Reading on Pixel-fitting
- Pixel-fitting — Dustin Curtis’s Pixel-fitting tutorial and discussion
- Pixel Hinting Vectors in Photoshop — video tutorial on how to pixel-fit your vector graphics using Photoshop
- How to Achieve Pixel Perfection in Photoshop — another video tutorial on how to perform pixel-fitting
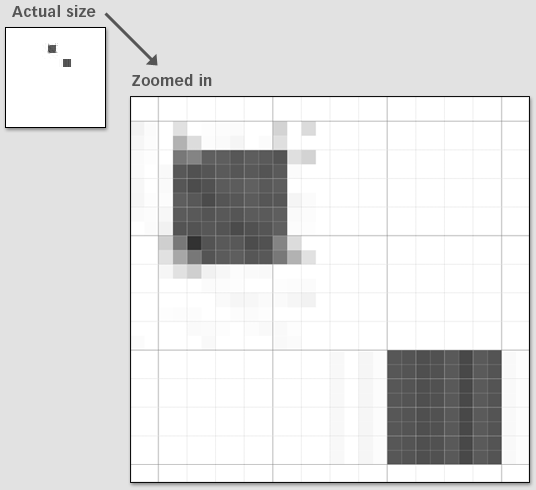
8-pixel Grid JPEG Optimization
I came across this trick from Smashing Magazine’s article called Clever JPEG Optimization Techniques. In the same article, you will also find other useful tricks for optimizing JPEGs.
A JPEG image is divided into 8x8px blocks, and each block can be treated as its own entity.
By carefully aligning parts of the image within the 8x8px grid you can lower the file size of the image as well as get better image-quality results.
To demonstrate: I created two identical 8x8px square objects that I then saved in JPEG using a very high compression level (to make the difference more pronounced). The top square is not aligned inside the 8x8px grid.
Notice the quality difference and the extra pixels that are rendered for the one that isn’t aligned to the 8x8px grid.
This optimization trick is useful for JPEG images containing rectangular objects because you can easily fit them in a grid.
Further Reading
- JPEG optimization. Part 1 — Sergey Chikuyonok (author of the Smashing Magazine article mentioned above) discusses the 8x8px JPEG concept in this tutorial
Selective JPEG Compression
The way typical JPEG compression works is a fixed level of compression is applied to the entire image.
In selective JPEG compression, we manually specify different compression levels for different areas of the image.
For example, we might want important areas of a photo to have a lower level of compression/higher-quality because we want to ensure that those areas look good. But then for other parts of the same image, like the photo’s background and low-detailed sections, we might be able to get away with a higher level of compression/lower-quality.
Demonstration
Selective JPEG compression can be done using Adobe Fireworks.
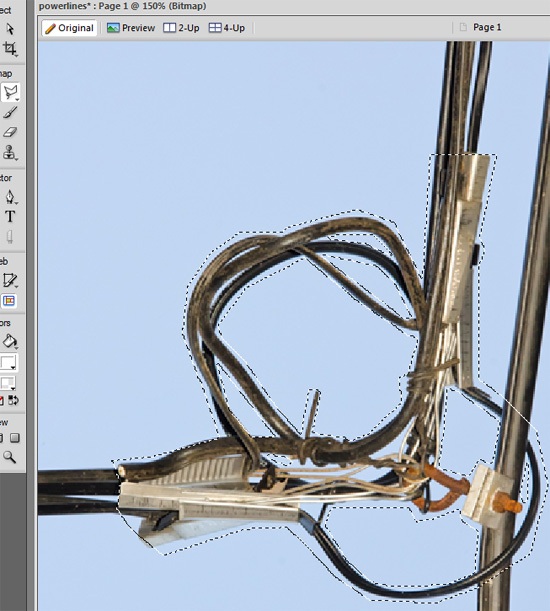
The photo below is compressed at a quality level of 80. Its file size is 54.0 KB.
Looking at the original photo, it appears that we use selective image compression, particularly by increasing the compression/lowering the quality of the blue sky in the background and most of the black wires.
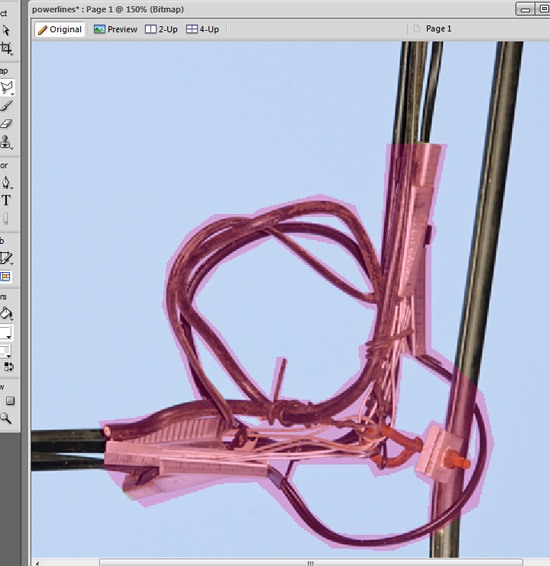
In Adobe Fireworks, we can mask the areas we want to protect. The masked area will have a higher quality level (80)/lower image compression. The rest of the image — the parts that are not masked — will get a lower quality level (60)/higher image compression.
We can use one of the Lasso tools (in my case, I used the Polygon Lasso tool) to place a marquee selection around parts we want to protect.
Once you are done selecting around the high-quality areas, go to Modify > Selective JPEG > Save Selection as JPEG Mask.
The parts of the image that will have a quality level of 80 will now be highlighted:
In the Optimize panel, lower the Quality option to 60 and set the Selective qualityoption to 80. (If you can’t see the Optimize panel, make sure Window > Optimize is checked.)
Then just go to File > Save as to save the original image as a JPEG.
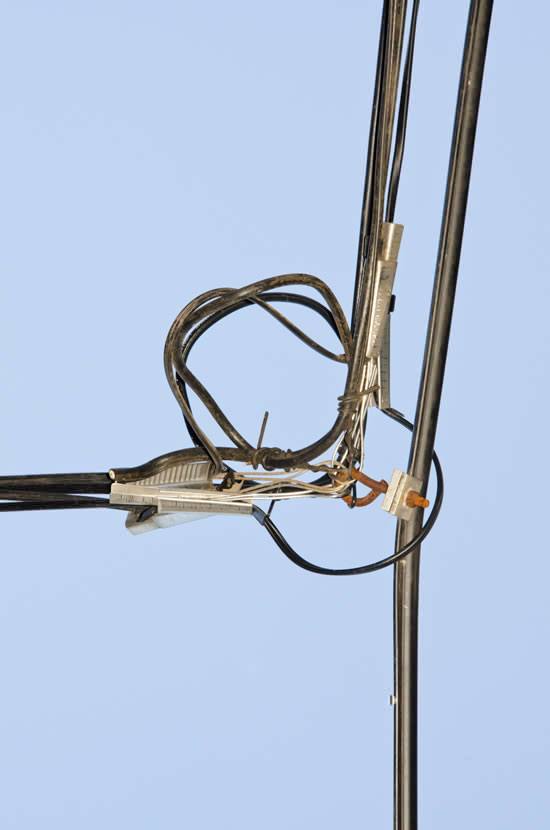
The image shown below uses selective compression. It’s 50.2 KB – a 7.0% decrease in file size versus the non-selective compression I showed you earlier.
You will have to play around with the selective compression settings and masking in order to get your desired results. In the case example above, detail-oriented folks will notice a huge difference between the two images. However, the results of the optimization might be alright under most people’s standards.
Selective JPEG compression is very time-consuming and the file size reduction is only slight in most instances. It’s impractical if you’re dealing with a lot of photos. However, if you are really concerned about optimizing image quality and image file size, this is one option.
Further Reading
- Selectively compressing areas of an image — an old tutorial on Adobe.com detailing the steps for selective image compression using Fireworks
Conclusion
There are simpler ways to optimize an image. Just using automated tools such as Photoshop’s Save for Web & Devices command and lossless compression tools like Smush.it can greatly reduce your image file sizes.
However, if you’re looking for finer image optimization control and even more file size reductions, try out the tricks above. An ideal workflow would be to use a lossless compression tool like Kraken.io or Smush.it, which will remove a big chunk of your image’s file size without affecting its quality. And then you can use the appropriate tricks discussed above to fine-tune your results.
Related Content
- The Comprehensive Guide to Saving Images for the Web
- 8 Excellent Tools for Optimizing Your Images
- 22 Professional Photoshop Image Enhancing Tutorials
- Related categories: Graphic Design and Website Management
About the Author
No comments:
Post a Comment